

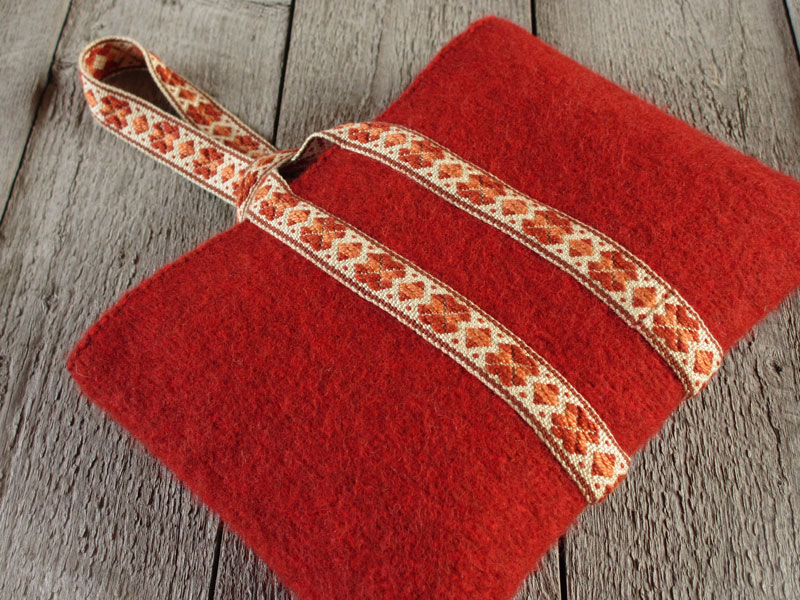
Pick-up bands make great trim for wool bags or pouches. I’ve designed these so that the trim extends in a loop at the top on each side, forming an easy and elegant closure and handle at the same time. The pouches themselves are knitted-and-fulled (felted). The size (about 10″ wide and 7″ high) is just right for a cute little purse or a tool pouch to hold a band heddle and shuttle. One pouch has a shoulder-length handle with a simple knotted finish (this one is pictured on page 103 of Norwegian Pick-Up Bandweaving). The other pouch has a wristlet-length handle with no knot.

I wove the bands on a simple band heddle and made the pick-ups and push-downs with my fingers. The band could of course be woven on the inkle loom or the pattern heddle (spaltegrind).
Wristlet-Length Handle
- Structure: Baltic-style pick-up (referred to as Type 2 pick-up in Norwegian Pick-Up Bandweaving). There are 2 background ends between the pattern ends in the threading.
- Supplies: Sewing thread to match the background color.
- Warp yarn: Perle cotton size 5/2 in four colors—background (I used UKI flaxon), border (I used Silk City tobacco), main pattern (I used Silk City paprika), and accent pattern (I used UKI melon).
- Weft yarn: Same as warp (background color).
- No. of ends: 45
- Color order: See the warp draft below.
- Width: 7/8″.
- Picks per inch: About 13-14, measured at a slack tension.
- Length: For the wristlet-length handle, you’ll need a band about 49½″ long after wet finishing. (I threaded my band heddle with a 3 yard warp and wove in pick-up for 60¼″. The band measured 57″ after wet finishing. I used 49½″ for the pouch and made a small bookmark with the rest as described at the end of this post.)
- Weaving: See the pattern charts below.
- Wet finishing: Hand wash in warm water and hang to dry, then lightly steam. (For this first wash I used Professional Textile Detergent from Dharma Trading Co. in case there was excess dye in the yarn.)
- Finishing: Straight stitch by machine across each end of the band in the valley between two weft shots. Fold under ½″ at each end and press the folds hard with a steam iron. (I positioned the folds so that when the two ends were butted, the pattern would match.) Pin the band to the pouch, centering and looping as shown in the photos—you want a short loop on one side for the closure and a longer loop on the other side for the handle. (I left about 1¼″ between the two strips and extended the handle about 7″ from the top of the pouch. I positioned the trim so that the join in the band, where the two folded ends were butted together, was near the bottom on one side, as shown in the photo above.) With sewing thread, whipstitch all the selvedges of the band to the pouch, then mattress stitch across the join.
Shoulder-Length Handle

Follow the instructions for the wristlet-length handle with these changes: Determine the finished length you need for your band, including plenty of length for tying the overhand knot in the end. Plan your warp length accordingly, taking into account take-up and shrinkage as well as loom waste. (My handle extends 16″ from the top of the pouch after knotting. My band was 73½″ after wet finishing.) Trim the band by cutting each end in the valley between two weft shots, carefully pulling out the last row of weft and clipping it off. After much wear and washing, a shot or two of weft might ravel out and need to be clipped, but a firmly-woven warp-faced band is very stable. Tie an overhand knot in the ends of the band and pin to the pouch as shown—you want a small loop on one side for the closure and a long loop on the other side for the handle. With sewing thread, whipstitch all the selvedges of the band to the pouch.
Warp Draft
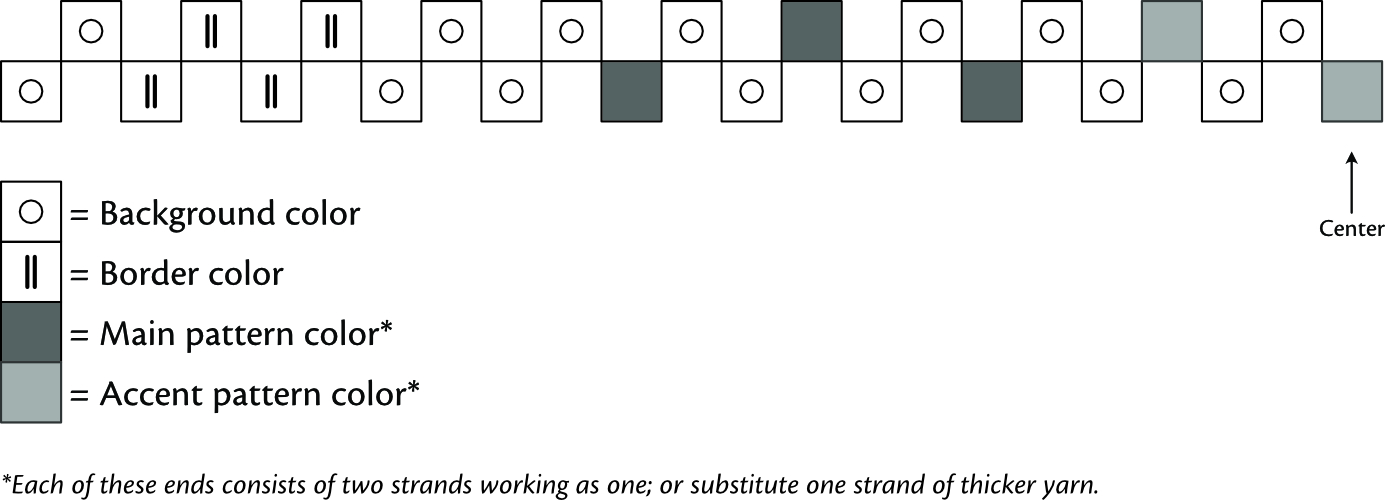
Read the draft from left to right through the center and then from right to left. The two rows on the draft represent the two threading positions on the loom, which in my case were hole and slot on the band heddle.
Pattern Charts
I used a rosette (a common motif in Norwegian pick-up bandweaving) alternating with a small diamond (a different diamond for each pouch). My patterns charts are shown below. In Norwegian Pick-Up Bandweaving, I introduced a system, helpful for some beginning pick-up weavers, of marking a pattern chart with caret symbols (for pick-ups) and Xs (for push-downs), explained on pages 128-29 of the book. But experienced pick-up weavers don’t need the symbols—they have a visual understanding of the motif as a whole and can quickly glance at the fell line to see which ends need to be manipulated on each shed. And weavers who are using the pattern heddle (spaltegrind) don’t need the symbols whether they are experienced or not, since the pattern heddle operates on a different system and such symbols would be a distraction. Therefore, I’ve given two charts for each pattern, one with the symbols and one without, so you can use whichever you prefer.


Knitting and Fulling the Pouch
The pouches have padding inside to round them out for the photos, and without anything inside they lie completely flat. I’ll tell you how I created them, but you will likely have your own preferred methods of knitting and fulling, or you might want to weave or sew a pouch from fabric or otherwise design your own.
- Yarn: Rauma Vamsegarn, 100% wool, 3-ply bulky knitting yarn, 80 meters per 50 gram ball, in red/rust twist. One pouch weighs about 92 grams. For scrap yarn I used worsted-weight cotton (non-fulling) yarn at the start and finish so I could later create the crisp finish along the top edge as described below.
- Gauge swatch: Before knitting the pouches shown, I made a half-scale sample (25 stitches and 60 rows) to use as a kind of gauge swatch (it is pictured on page 103 of Norwegian Pick-Up Bandweaving with a narrow pick-up band for a handle). It was exactly half the size I wanted, so I doubled the stitch and row counts for the pouches.
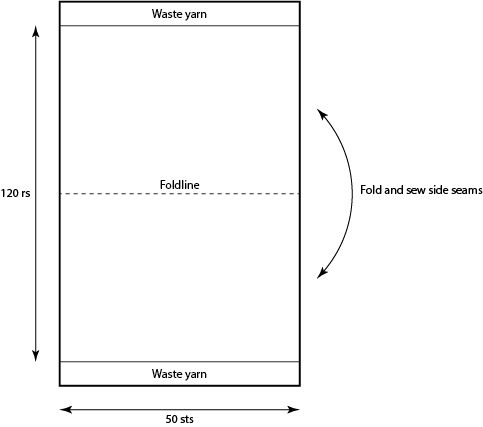
- Knitting: I used a bulky-gauge knitting machine (Toyota KS610, stitch size 5.0). I cast on 50 stitches and knitted 120 rows). See the diagram above.
- Dimensions after knitting: 12¾″ wide and 21½″ high.
- Seaming: I folded the flat piece in half, wrong sides together, and seamed the sides by loosely whipstitching with project yarn, catching only the outside loop of the edge stitch on each side.
- Dimensions after seaming: 12¾″ wide and 10¾″ high.
- Fulling: I hand-fulled one pouch in the kitchen sink, the other in a front-loader washing machine.
- Finished dimensions after fulling: About 10″ wide and 7″ high.
- How to get the crisp edge finish at the top: After fulling, cut away the scrap yarn. Even though the cotton scrap yarn does not full, it is tightly held by the fulled stitches and requires a bit of work to get it out. With the scrap yarn removed, hold the edge up to the light to see the open stitches. Using project yarn and a blunt tapestry needle, backstitch through the open stitches, from right to left on the right side of the pouch.

A Bookmark from the Leftover Piece
I wove one band a little longer than I needed, and I ended up with a short leftover piece that I used to make a little bookmark. I made a narrow, double-fold hem at the top and whipstitched it in place with sewing thread. Then, to make fringe, I carefully pulled out some of the weft shots at the other end with the help of the blunt tip of a tapestry needle. I secured the weft by hiding the end extending from the last shot in the shot just above it with the tapestry needle. Because I’d already washed and steamed the band, the bookmark is sporting definite ringlets, which I think add to its charm (though they’ll probably come out in the wash).
The Reverse Side


Leave a comment