
If you’re new to pick-up weaving, you’ll find that the more you understand about pattern charts, the more relaxed and efficient you can be as you weave. Plus, it’s fun to create your own patterns. To illustrate the basics, here are some examples in Baltic-style pick-up (referred to as Type 2 pick-up in Norwegian Pick-Up Bandweaving; there are 2 background ends between pattern ends in the threading). These patterns can be woven on the band heddle or inkle loom using the finger method of pick-up, or they can be woven on the pattern heddle (spaltegrind) using a pointed shuttle to select floating pattern ends. Both methods are described in Norwegian Pick-Up Bandweaving. To keep it simple, I’ve limited the charts for this discussion to seven pattern ends and only included what I call “natural” designs—those that have no straight horizontal lines. The most basic warp draft for these designs is shown below.

Reading Pattern Charts
On pattern charts, one vertical column represents one pattern end and one horizontal row represents one shot of weft. If a square is colored in, it means that that pattern end appears on the front of the band (above the weft) on that shot. When this threading is woven in warp-faced tabby, alternating dots or flecks in pattern color appear, represented in chart form by a checkerboard (see the leftmost example in the chart below). This is the underlying structure for any pattern you weave on this threading.

Creating Pattern Charts
Here’s one way to make a chart: begin with a tabby checkerboard in pencil, then fill in squares to create floats and erase squares to create solid areas of background color. Remember that floats longer than five rows are usually not practical unless you’re working in very fine yarn. And since a solid area of background color on the face creates a float on the reverse, solid areas of background color are also usually limited to five shots. In the second example from left in the chart above, caret symbols were placed on all the squares that were colored in to create floats. In the third example from left in the chart above, x symbols were placed on all the squares that were erased to create solid areas of background color between motifs.
Of course, if you understand how floats and solid background areas relate to the underlying tabby structure, you don’t need to begin with the checkerboard. You can just color in floats and flecks on the graph paper. Notice how two adjacent floats overlap by two rows and how motifs are built up in stair-step fashion. And in these “natural” designs, any vertical span of squares on the chart—whether light or dark—is over one, three, or five rows.
Basic Motifs: Diagonal Lines, Zigzags & Chevrons
Pick-up patterns in this weave structure develop naturally along diagonal lines, and the simplest motif is a diagonal line (first example at left in the chart below). Floats over five rows provide a way to pivot the diagonal line. If a diagonal line pivots at the sides, a zigzag is formed (second example from left). If a diagonal line pivots at the center, a chevron is formed (third example from left). Chevrons can combine to form diamonds and diagonal crosses or Xs (fourth example from left).

Pivot Points
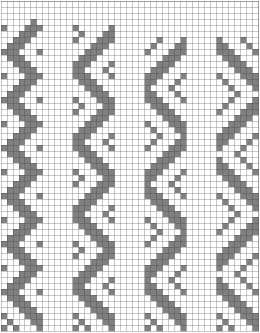
The size and shape of a motif changes depending on the where the pivot point is placed. Zigzags, for example, can be pivoted on the third pattern end from the side, the second pattern end from the side, or the outermost pattern end. They can also be unconnected at the sides where the diagonal line changes direction. These four variations are shown in the chart below.
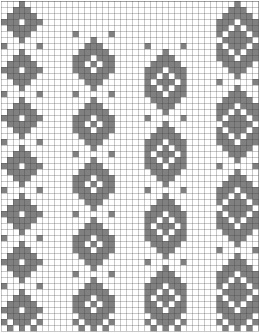
Diamonds can also change in size and shape as the pivot point is moved. They can pivot on the third pattern ends from the sides, the second pattern ends from the sides, the outermost pattern ends at the sides, and by reversing direction but remaining unconnected at the sides. These four variations are shown in the chart below. X-shapes can be similarly varied as their pivot point is moved. The more pattern ends you have, the more complex your designs can be, and complex motifs have multiple pivot points.
Spacing of Motifs
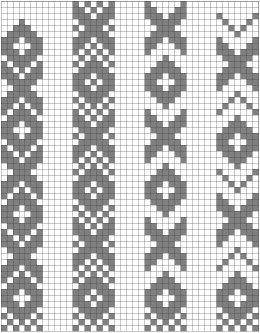
The appearance of a pattern changes depending on how motifs are spaced. Motifs can be stacked closely together, woven with flecks between them, or woven with solid areas of background color between them. In larger areas of background color, flecks add visual interest and keep the floats on the reverse from becoming too long. These four variations are shown in the chart below.
Have fun
It’s surprising how many patterns are possible on as few as seven pattern ends, and they can all be woven on the same threading. Because the back of the band in this weave is almost always as attractive as the front, you get two patterns from every chart. I hope you enjoy playing with patterns for pick-up weaving as much as I do.♦

Leave a comment