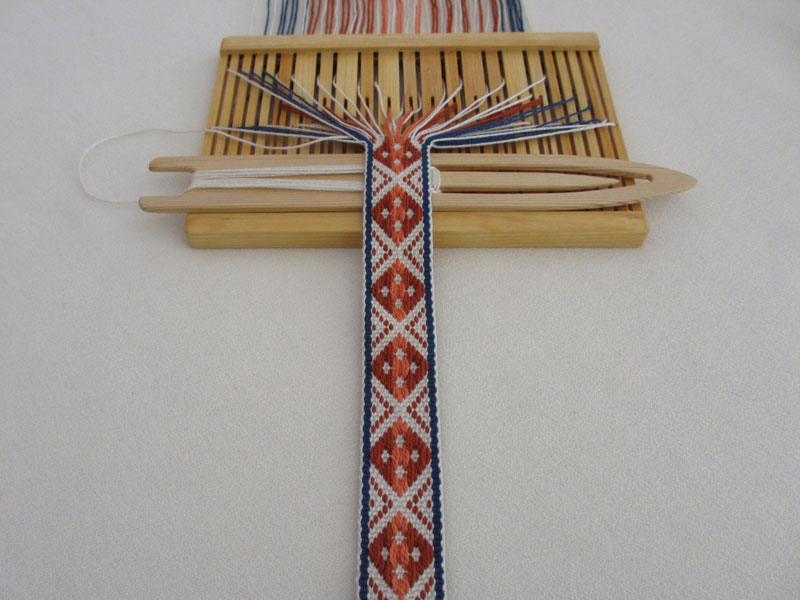
Here I’ve used a pick-up band to trim a wool bag that I wove on a rigid heddle loom and then fulled. The band does double duty—first by encasing the raw edge of the top of the bag, which was folded to the outside, and second by providing a decorative finish and focal point for the piece. This leaves the inside of the bag completely smooth, and there’s no need to add a lining. The bag is about 10″ wide and 13″ tall. Here’s how I made it.
Weaving the Band for the Trim
- Structure: Baltic-style pick-up (referred to as Type 2 pick-up in Norwegian Pick-Up Bandweaving; there are 2 background ends between pattern ends in the threading).
- Supplies: Sewing thread to match the background color.
- Warp yarn: Perle cotton in size 5/2 in four colors, background (UKI natural), main pattern (Valley burnt sienna), accent pattern (UKI melon) and border (UKI cobalt blue).
- Weft yarn: Same as warp (background color).
- No. of ends: 57
- Color order: See the warp draft below.
- Width: 1-1/16″.
- Picks per inch: About 14½, measured at slack tension.
- Length: For this size bag, you will need a band about 23-24″ long after wet finishing. From a long warp on my pattern heddle, I wove and cut off a 27″ length, which shrunk to 25″ after wet finishing.
- Weaving: See the pattern charts below.
- Wet finishing: Hand wash in warm water and hang to dry, then lightly steam.

Warp Draft

Read the draft from left to right through the center and then from right to left. The two rows on the draft represent the two threading positions on a band heddle or inkle loom. Since I was using a pattern heddle (spaltegrind), I threaded the pattern ends through the special short slots and the background and pattern ends in the regular holes and slots.
Pattern Chart
I used a simple hatched diamond (a common motif in Norwegian pick-up bandweaving). I like to weave this pattern with the diamond side up, but I used the reverse side of the band for trimming the bag. My patterns chart is shown below and I’ve included both sides of the band so you can work with whichever side you prefer.

Below is another version of the chart, in which I’ve marked the first repeat with caret symbols (for pick-ups) and Xs (for push-downs), a system that is explained on pages 128-29 of Norwegian Pick-Up Bandweaving. This can be helpful for some beginning pick-up weavers, but experienced pick-up weavers don’t need the symbols—they have a visual understanding of the motif as a whole and can quickly glance at the fell line to see which ends need to be manipulated on each row. And weavers who are using the pattern heddle also don’t need the symbols, whether they are experienced or not, since the pattern heddle operates on a different system and such symbols would be a distraction.


Pattern Chart Variations
If you want to change the look of the diamond along the length of the band, here are some variations to try.

And here is the same chart showing the reverse side.

Weaving and Fulling the Bag
- Yarn: I used Borgs Tuna, 100% wool, 6/2 weaving yarn, approx. 330 yards per 100 gram skein, in orange (#3444) for the warp and rust (#3765) for the weft (about 70 grams for the warp and 56 grams for the weft).
- Loom: I used a rigid heddle loom with a 10-dent heddle.
- Warp Length: 62″.
- Number of Ends: 138.
- Weaving: I hemstitched both ends and wove off the whole warp in balanced tabby. I trimmed the ends, leaving about ½″ fringe in addition to the hemstitching.
- Dimensions: Off loom, the piece measured 12¾″ wide and 42½″ long between the hemstitching.
- Finishing: I folded the flat piece in half and seamed the sides by loosely whipstitching with weft yarn, then I fulled it in the washing machine.
- Dimensions after finishing: After fulling, I cut off the fringe and the hemstitching, plus 5/8″ from the top of the bag, and folded down 2¾″ to the outside at the top, and the bag then measured 10″ wide by 13″ tall.
- Handles: For each handle I cut eight strands of warp yarn (bundle of orange) and eight strands of weft yarn (bundle of rust) about 25′′ long and used a fringe twister to twist the two bundles together. With a crochet hook I poked holes in the top fold of the bag about 4′′ apart, pulled the ends of the cord through and knotted them so the handles have a drop of about 5′′. For security, I neatly tacked the knots to the inside of the bag with sewing thread.
- Stitching the trim in place: At one end of the band, I straight stitched by machine in the valley between two weft shots, trimmed the end one shot away from the stitching, folded under ½″, and pressed hard with the steam iron. I pinned the trim to the bag so that it extended over the raw edge by about 1/8″. With sewing thread, I whipstitched both selvedges of the band to the bag. I finished and turned under the other end of the band in the same way as the first, after one selvedge was sewn to the bag and I could determine the proper length. I mattress stitched across the join where the two folded ends of the bands butted together. The fiddly part of the stitching process was at the sides of the bag where it was necessary to ease in the bottom of the band a bit around the corners.♦

Leave a comment